Introduction
If you’ve ever struggled to draw realistic faces, you’re not alone. The loomis method is one of the most trusted techniques artists use to simplify head drawing. It breaks down the human head into manageable shapes, making proportions easier to understand and replicate.
Whether you’re a beginner or someone refining your skills, this method helps you draw heads from any angle with confidence. In this guide, you’ll learn exactly how it works, why it’s effective, and how to apply it step by step.
What Is the Loomis Method?
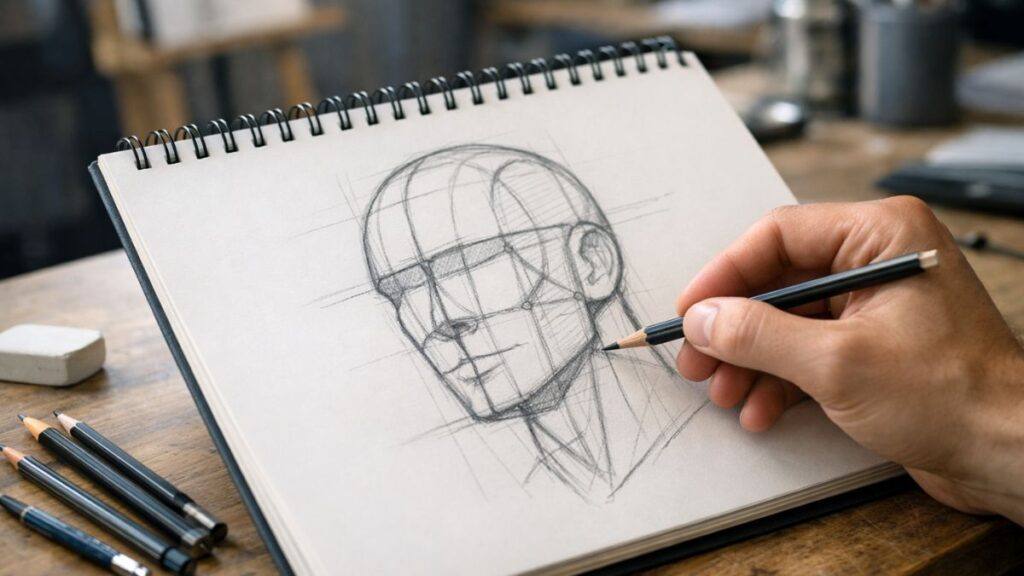
The Loomis Method is a structured drawing technique created by illustrator Andrew Loomis. It simplifies the human head into basic geometric forms, primarily a sphere and guidelines.
Key Idea Behind the Method
- Start with a sphere to represent the skull
- Add a jaw to form the complete head shape
- Use guidelines to map facial features accurately
This approach allows artists to maintain correct proportions while drawing from imagination or reference.
Why the Loomis Method Works So Well
The method remains popular because it balances simplicity with accuracy. Instead of copying what you see, you build the head logically.
Benefits at a Glance
| Feature | Benefit for Artists |
|---|---|
| Geometric construction | Easier to understand head structure |
| Consistent proportions | Improves accuracy |
| Works from any angle | Boosts drawing flexibility |
| Scalable skill | Useful for beginners and professionals |
Because of these advantages, many illustrators and animators rely on this method daily.
Step-by-Step Guide to Using the Loomis Method
Let’s break down the process into simple, actionable steps.
Step 1: Draw a Sphere
Start with a circle. This represents the cranium.
Step 2: Add Side Planes
Cut off the sides slightly to create flat planes. This helps define perspective.
Step 3: Draw the Center Line
Add a vertical line that shows the direction the head is facing.
Step 4: Place the Eye Line
Draw a horizontal line halfway down the sphere. This is where the eyes sit.
Step 5: Build the Jaw
Extend lines downward to form the jaw and chin.
Step 6: Map Facial Features
Use proportional guidelines:
- Eyes: halfway down the head
- Nose: halfway between eyes and chin
- Mouth: halfway between nose and chin
United Flight UA109 Diversion: What Happened, Causes, and Passenger Impact Explained
Loomis Head Proportions Explained
Understanding proportions is key to mastering this method.
Standard Proportion Guide
| Facial Feature | Placement Rule |
|---|---|
| Eyes | Middle of the head |
| Nose | Between eyes and chin |
| Mouth | Between nose and chin |
| Ears | Between eye line and nose line |
These ratios help maintain realism without constant measuring.
Drawing Heads from Different Angles
One of the biggest strengths of the Loomis Method is its flexibility.
How It Adapts to Angles
- Tilt the center line to show direction
- Adjust the eye line to reflect perspective
- Modify the jaw shape accordingly
Common Angles You Should Practice
- Front view
- Profile (side view)
- 3/4 view
- Upward angle
- Downward angle
Practical Example: Applying the Loomis Method
Imagine you want to draw a character looking slightly to the left.
- Draw a sphere
- Tilt the center line left
- Add the eye line at a slight angle
- Build the jaw following perspective
- Place features using guidelines
By following these steps, your drawing will instantly look more structured and realistic.
Pros and Cons of the Loomis Method
Pros
- Easy to learn for beginners
- Builds strong foundational skills
- Works for all head angles
- Improves consistency
Cons
- Can feel mechanical at first
- Requires practice to look natural
- Not ideal for stylized art initially
Common Mistakes to Avoid
Even though the method is straightforward, beginners often make avoidable errors.
Frequent Issues
- Placing eyes too high
- Ignoring the sphere structure
- Drawing flat faces without depth
- Misaligning the center line
Quick Fix Tips
- Always start with construction lines
- Double-check proportions
- Practice with simple sketches first
Best Practices for Mastering the Loomis Method
To truly benefit from this technique, consistency matters.
Smart Practice Strategies
- Draw 10–20 heads daily
- Use references alongside imagination
- Study real anatomy
- Practice different angles repeatedly
Skill Progression Framework
| Practice Stage | Focus Area | Goal |
|---|---|---|
| Beginner | Basic shapes | Understand structure |
| Intermediate | Angles & proportions | Improve accuracy |
| Advanced | Expression & variation | Add realism and style |
Tips for Improving Faster
If you want to speed up your progress, focus on deliberate practice.
- Use light sketch lines first
- Compare your drawings with references
- Study different face types
- Keep a sketch journal
Also, don’t aim for perfection. Instead, aim for improvement with each sketch.
Conclusion
The Loomis Method is more than just a drawing technique—it’s a foundation for understanding how the human head works. By breaking complex forms into simple shapes, it makes drawing approachable and structured.
With regular practice, you’ll not only improve your proportions but also gain the confidence to draw faces from any angle. Start simple, stay consistent, and your skills will grow naturally over time.
FAQs
1. What is the Loomis Method used for?
It is used to draw human heads accurately using simple shapes and guidelines.
2. Is the Loomis Method good for beginners?
Yes, it’s one of the best methods for beginners learning proportions.
3. How long does it take to learn the Loomis Method?
Basic understanding can take a few days, but mastery requires weeks of practice.
4. Can I use the Loomis Method for digital art?
Absolutely. It works for both traditional and digital drawing.
5. Do professionals still use the Loomis Method?
Yes, many professional artists and illustrators rely on it.